|  | |
A Deadlands: Weird Wars Adventure | ||
| by T. Jordan "Greywolf" Peacock |
| | |
A Deadlands: Weird Wars Adventure | ||
| by T. Jordan "Greywolf" Peacock |
|
Introduction Locations: Part 1 Locations: Part 2 Resolution |
The Players Scenery and Miniatures Playtest Notes Avatar of Anubis |

The following sections detail the major locations of the tomb, and what obstacles or opportunities are there. I have not gone into great detail about what treasures can be found, or their value, since this was written up as a convention game, and it doesn't matter so much within the scope of a one-shot game just how rich anyone will be after the adventure is over. (It's just that someone with Greedy as a Hindrance should be getting chips for risking his neck to get rich quick.)
The Marshal should feel free to go into greater detail about the treasures to be found here, and how much they may be worth if sold.
Furthermore, there are sample chip awards listed for each room that will probably be considered overly generous for a long term campaign. These are listed for a convention scenario - again, where there is little concern about the future, but primarily because chip awards provide one way to determine a "winner" for the scenario.
Sample "time required" listings are provided to give some ballpark idea of how much time it might take to get past certain obstacles. This might be faster or slower depending on who is in the party. For instance, if Brahm (the pre-generated "Strong Man" character) is in the party - or someone similarly possessed of superhuman strength - then the times listed for tasks involving brute force or raw strength might be halved, or take even less time. (Where it may take two people to carry an urn full of oil in the Fire Room, Brahm could stick one under each arm.) Similarly, if someone is trying to spend time deciphering hieroglyphs, if that PC makes a really high Smarts roll, he might be able to halve the time required, or better ... and characters who don't even know how to read hieroglyphs are going to have a much harder time figuring this adventure out.
Assume that the base camp includes a selection of "general equipment" that the players may go back to for supplies should the need arise. Give the players a chance to "requisition" equipment that they may think is useful - If, during the course of the adventure, they realize that they've forgotten (or broken!) something, returning to camp can produce some fairly "standard" equipment, but nothing particularly exotic. Food, water, extra rope, torches, lanterns, extra batteries, fuel, misc. excavation equipment, a camera, etc., would be appropriate.
Unless one of the PCs is out here when the Nazis arrive, or if there is a major conflict within the Posse, not much action is likely to take place out there.
The door is already open to the tomb, thus allowing some ambient light into the Entryway, but not providing much light at all beyond that point.
If anyone bothers about it, there is a curse inscribed upon the lintel of the entranceway, reading (in Egyptian hieroglyphics): "Woe to he who disturbs this tomb, for the gods will strike him dead, and the jackals feast upon his tender parts." If anyone with the ability to read Ancient Egyptian is able to translate this, and can match or beat 11 on a Knowledge or Academia: Occult roll, he will be able to discern that it is possible to translate this as saying that "the pharaohs" will strike him dead, or perhaps even just "the pharaoh", and that "jackals" may not be plural.
This is not terribly informative, but it is an allusion to the presence of Aye and "Anubis", and that they themselves may be able to exact retribution upon those who disturb their rest.
 "The harsh rays of the sun give way to shadows in the dusty, gently downward sloping passage that leads into the broken cliff face. The floor is thick with dust and grit, and a door plug can be seen at the far end of the passage. Closer to the entrance and on the left, however, amidst the sand can be seen a human skeleton, adorned in a pith helmet and rags of clothing, with a wooden spear shaft jutting from its ribcage. Opposite the skeleton, on the right, can be seen a hole that the spear must have come from, and broken bits of plaster that it must have gone through to get the unlucky explorer."
There is a skeleton on the floor, near the entrance, of a previous explorer, fallen victim to a spear trap. If someone is callous enough to swipe the pith helmet, it offers AV -4 to the crown of the head (50% chance of protecting the head in the case of a combat hit). A particularly greedy PC can rifle through the skeleton's wallet and find ten pounds sterling.
This isn't, in fact, the only spear trap. The skeleton in question is on the left side of the corridor. Continuing from this floor tile in a zig-zag fashion onward, the right tile on the next row is booby-trapped, with a spear that launches from the left side. The next row has a tile on the left side, with a spear coming from the right side. And so on, it continues. If anyone steps on a trapped tile, the tile depresses and there is a chance of the spear launching from the wall. Roll 1d6 and consult following chart:
| Roll | Result |
| 1-2 | Trap springs, but only enough to break through the plaster - without enough strength to actually hit anyone or do damage. |
| 3 | Trap fails to spring ... this time. |
| 4-6 | Spear breaks through plaster, shoots through hole, potentially hitting anyone standing in this row (whether on the booby-trapped square or not). Potential victims must make a dodge roll against a TN of 5 to avoid being hit - against a TN of 1 if the target is running all out through the trapped area. |
The trap can be bypassed several ways. First, one could use a pole or other implement to press tiles before stepping on them, thus setting off traps ahead of time. If a PC is doing this, and the tile fails to set the trap, if the PC can make a TN of 3 on Smarts or tinkerin', he can figure out that he should probably try another time before proceeding, just in case.
Second, one could step on the non-trapped tiles, zig-zagging through the corridor, thus not setting off the spears at all. Third, one could just make a mad dash through, setting off the spears behind him ... but someone who does this is lining up for disaster at the next trap....
The fastest way to deal with the traps in this room is to get a barrel of water from the miscellaneous supplies and roll it down the tunnel. This will not only trigger and most probably set off most if not all of the traps, but will alert the heroes to the presence of the pit trap at the end, too! (Plus, when the barrel busts, it'll really annoy the snakes.) There is the possibility that some of the spear traps might not go off, but the heroes would be rightly suspicious if they see a long string of spears going off ... and then there's just one part where they didn't. A tentative prod with a pole would likely solve the problem.
At the end of the corridor is a pit trap especially made for wise-guys who just run through at full pace, without any care. It affects a two-by-two area at the very end, with a hinged floor tile that swivels in the middle.
If someone steps on one side, it tips over, dumping the unfortunate victim into a pit of asps. The victim must make a TN of 7 on a Nimbleness or Deftness check (victim's choice) to either leap free or grab for the edge (respectively) before falling in - TN of 9 if the victim was running at the time. If any other heroes are within reach, if they can make a TN of 5 on Quickness, they can react in time to try something (like grabbing the victim, snaring him with a whip, etc.) to prevent a disaster.
Falling into the pit is bad. It's an eighteen foot drop, with spikes at the bottom, resulting in 3d8 damage, AP 1, to a lower body hit location (roll 1d10 and consult the hit location chart). Then, on top of that, there are five asps there (use the statistics for rattlesnakes) that have crawled into this nice, cool, dark place through holes in the stone, and which will attempt to bite whatever has invaded their pit.
The pit can be bypassed either by leaping over (not a good option until the door on the other side has been opened), by carefully stepping into the middle of the rotating panel (on the axis) and then stepping across ... or else by using iron spikes to wedge the panel in place. The latter course is the failsafe method, and requires four spikes to do successfully. (If the PCs don't have any in their personal possession, they can get some and a mallet back at Base Camp.)
Once the pit and spear traps are surpassed, there is another door, bearing another dire curse: "May he who disturbs the rest of Anubis be brought down to the grave, and reduced to ashes." The door is a rectangular stone plug surrounded by a mortar seal. A chisel and mallet can be used to chip away at the mortar. As soon as there is a hole in the mortar seal, foul-smelling air will rush out, making an ominous howl, and any torches held by the party will momentarily flare up. Anyone with knowledge of medicine or chemicals may be given a hint by the Marshal that the scent is hard to place, but smells volatile.
This ends quickly, and the door can be opened without trouble.
There are also murals along each side of the corridor. If anyone in the group has the ability to read hieroglyphics, they can decipher the following scenes:
"A mixture bringing the four elements together - In the form of Water; Stored in Earth; Ignited by Air; Turning into Fire."
Sample Times Required:
Sample Awards:
For the "four hour" target length, this trap might be left out. It's not particularly clever, anyway, but just there to keep the PCs on their toes ... and also so that they won't be unduly suspicious when they get to the next room and find the apparent object of their quest. (They'll likely be suspicious anyway, but why make it obvious?)
When the door is opened, there are two pressure-points that will be released - in the form of two "buttons" set in each door post, one to each side, about mid-height. Once the door plug is removed, the pressure on these buttons is relieved, thus arming the trap on the other side. The trap will not be set off immediately - It will go off a few seconds after the door is out, timed so that if someone opens the door then promptly sticks his head (or arm or leg) in, he's going to encounter a couple of pendulum blades. If, however, the PCs wait before stepping in, the blades are going to swing by first, presumably harmlessly. Plus, if anyone bothers to check for traps while dealing with the door, he's almost certain to detect the "buttons". As long as the PCs find some way to make certain that the buttons aren't allowed to pop out once the door is removed (such as, for instance, sticking a pole of appropriate length up to hold the buttons in when the door plug is pushed out), they won't engage, and the trap will still be set.
On the opposite side, the trap is plainly visible as a couple of large bronze blades on wooden poles hanging from pegs in the wall, set to swing freely once the trap is set off. Anyone in the path of a swinging blade must make a dodge roll against a TN of 5, or get hit by two regular 2d10 damage attacks. (If arms or legs are hit, one of the blades will always hit the left, and the other blade will always hit the right.) Ideally, however, this should be something the heroes should be able to easily bypass, and perhaps even leave set up as a "surprise" for any following Nazis.
For the purpose of a convention scenario, however, it's probably best to leave this out. The process of getting past this trap was a bit hard to explain and coordinate, and took somewhere between ten to twenty minutes to get past in the original playtest. At Necronomicon, though, it only took a few seconds - as the Posse hadn't thought to check for a trap. If time isn't an issue, though, it can be a chance for the Posse to display teamwork and care.
Sample Times Required:
Sample Awards:
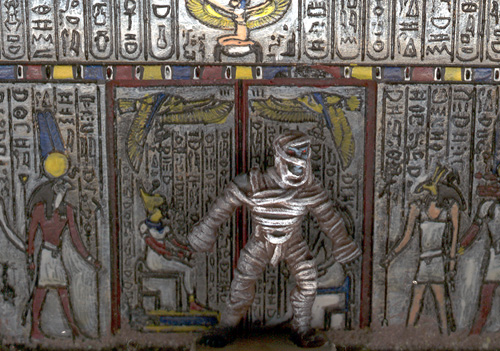
"Hieroglyphs and paintings run along the walls of this roughly square-shaped room, with several depictions of Aye on the far wall, and stylized red flame-like designs licking upward from the floor. Unlike the previous corridor, this chamber is relatively free of sand, and has very little accumulation of dust beyond a thin layer. Dominating the chamber is a stone pedestal, upon which is a mask of lacquered wood, polished obsidian, lapis lazuli and gold foil, fashioned in the likeness of the face of Anubis. In each corner of the room is a sealed clay pot, sealed with a plug and wax."
If anyone checks for traps, the room practically begs for them, especially given the unlikelihood of having the object of the quest right here, in the second room! The clay pots hold a volatile concoction invented by Aye that will explode upon exposure to air. If any pot is opened or ruptured, it will explode for 6d8 of massive damage. (Treat each pot as having a Size of 6, and if any pot takes at least one Wound from this damage, it fractures and explodes as well, potentially causing a chain reaction.) The area of effect for each explosion is a burst radius of 10 yards - sufficient to fill the room and back-blast down the corridor the PCs came from. Above each pot, there are tell-tale cracks in the ceiling plaster that hint at drop-blocks poised above each corner of the room - that is, above each pot. These drop-blocks would be set off if anyone jostles the pedestal in the center of the room.
The trap can be disarmed quite simply by moving the pots away from the corners, and by making sure nobody is standing under the drop-blocks. If anyone is, when the pedestal is jostled, it would be likened unto having a brick dropped on one's head.
If the explosion goes off, let the heroes make Quickness tests against a TN of 7 in order to be able to react in time to get to cover. Anyone wholly shielded from the blast (by being around the corner, for instance) will take no damage. Anyone partially shielded by wall sections may ignore damage against shielded hit locations. Anyone who passes a Quickness test can dive for cover (if there's any to be had) up to half of one's Pace away, or try to shield someone (or something) from the blast.
Anyone under a falling ceiling block may make a dodge test against a TN of 5 to avoid it. If anyone fails this test, Vamoose actions may be taken as well.
If anyone is hit by a Block Trap, roll for hit location by rolling 1d10 and adding it to 10, then consulting the regular hit location chart. Damage is 2d10; even if no Wounds are inflicted, at least 1d6 Wind will be caused, and the target must make a Strength test against a TN of 5 to not be knocked over.
Once the pots are moved, the mask can be removed, and when the blocks drop, no explosions should result - no harm done. It is possible to remove the mask without setting off the trap, but this would require a filchin' roll vs. a TN of 11, and a deliberate attempt not to set off the trap. Even disturbing the mask at all (brushing it, touching it, etc.) runs a risk of setting off the trap - This is automatic if the person is careless; otherwise, it requires a Deftness or filchin' roll (player's choice) vs. a TN of 7 not to set off the trap.
Actually putting on the mask is not a good idea. There are needles inside the mask tipped with trace elements of poison ... but, fortunately, a poison that has long since lost its potency. Still, there's a slight chance of injury for putting on the mask - 1d4 damage to the head.
If the explosions should go off, the mask is guaranteed to be destroyed in the process - It is in decent condition, but is not sturdy enough to be dropped or subjected to flying shrapnel.
Incidentally, this is not the Mask of Anubis. It is merely a lure and a decoy.
The north wall of the room has a hidden door behind a layer of plaster covered with hieroglyphic depictions of Aye. If anyone should deliberately search the room for secret doors, they can detect suspicious cracks in the plaster if they make a TN of 7 on search. If anyone directly disturbs the walls - such as by trying to make rubbings of the images, or deliberately pounding on the walls - then bits of plaster will flake off, revealing part of the hidden door. Setting off the explosion most definitely counts as "directly disturbing the walls".
The plaster can be cleared away in a matter of minutes, revealing another door plug. This door plug, if examined, bears the inscription, "Disturb not the articles for the journey to the afterlife."
If the walls are studied, the images tell more of the story of Aye and Tutankhamen:
Note: If your players are not already familiar with the gruesome details of mummification, it may be necessary to insert another clue here. Rather than leaving the players in suspense, you could also add that the mural depicts Aye going through the process of mummification, though he is depicted as if he is still somehow alive while going through this.
There's a lot more to it than this, but among other things, the brain is removed with a metal hook through the nose, and discarded. (The brain is very moist, and a crucial part of mummification is to dry the body.) The torso is opened, and the vital organs are removed as well - the lungs, intestines, stomach and liver - and placed into containers known as "canopic jars", traditionally sealed with ornamental stoppers that resemble the heads of the four sons of Horus. The heart, however, is left in the body.
The body is wrapped, allowed to "drain", and dried. Normally, this would result in a gaunt corpse, but according to Anubis' ministrations (and the sacrifice of a few slaves to provide some rejuvenating life force), this resulted in Aye becoming a new member of the living dead.
Sample Times Required:
Sample Awards:
"This chamber is laden with treasures aplenty, meant to provide the necessities for the departed soul in the afterlife. Finely carved statues of slaves - Ushabti - stand at the ready for commands from their master. A finely crafted model of a longboat rests on a stand. Horses of lacquered wood have semi-precious and precious stones imbedded in their livery, as they pull a magnificent chariot covered in gold foil. Coffers hold jewelry of precious metal and jewels, and sealed urns hold precious incense and oils. Much of the woodwork has suffered greatly from the march of time, but there is still much that glitters here that is most definitely gold.
Running straight down the center of the clutter is a path marked in earth-colored tiles, leading to another door plug at the opposite end. Murals run the length of the walls, as in the chambers before, depicting a fierce battle."
This chamber is filled with marvelous treasures ... and danger aplenty. The area just inside the door, and the path through the center are safe to walk upon, but that's about it. Anyone who searches for traps will notice a couple of stone blocks lying on the floor, crushing some broken statuary and jewelry they fell upon ... and looking upward reveals that they came from the ceiling. Cracks hint at drop-blocks all over the ceiling, such that the entire room might cave in if a trap is set off.
If anyone tries to snare any treasure, a good amount of it is rigged up to set off traps. Some items are resting on pressure tiles, such that if the weight is released (or if something significantly heavier pushes down on the tile), the trap will be set off. It is possible to try to deftly swap an item with something of equal weight - requiring a filchin' roll against a TN of 11, or else two successful rolls - one of Smarts and one of Deftness - against a TN of 11. Failure sets off a block trap.
Some items are attached to wires that will also set off a trap. These are set off by tugging the wire, so the solution is to snip any such wires.
There are also a few floor plates that will set off a trap just by stepping off the path.
The room is full of all sorts of treasure, more than the Posse could realistically carry off. If anyone should step on a tile off the central path, there is a 50% chance that a block will drop on his head. If anyone grabs a piece of treasure, there's a 50% chance that it's a wire trigger, a 25% chance that it's a pressure trigger, and a 25% chance that there's no trap on it at all - but that the item is some sort of decoy. (i.e., paste gems, an urn full of foul liquid rather than ointment, a piece of jewelry trapped to inject poison into the wearer, etc.) It's up to the Marshal to be come up with details here, but basically this is an opportunity for any PCs with "Greedy" to risk their necks for a chip or two.
It's possible to set off a block trap by poking at items with the proverbial ten foot pole ... but this will likely result in the treasure in question being crushed underneath. Trap disarmed, treasure ruined. But at least now you have a safe spot to stand off of the path!
The mural continues the story of Aye and the tomb, as follows:
One other little surprise about the murals, however, is that there are eight mummies buried in the walls, behind the plaster. These are mummified acolytes that served under Aye, who were buried with him to serve him in death, in yet another attempt by Horemheb to "appease" Aye. They all had enough of a part in this sordid chain of events that they've earned the interest of the manitous ... and when the time is right, they will burst through the walls as the Egyptian version of Walkin' Dead.
They have statistics equal to Walkin' Dead, except for a few important distinctions:
Sample Times Required:
Sample Awards:
Introduction
Locations: Part 1
Locations: Part 2
Resolution
The Players
Scenery and Miniatures
Playtest Notes
Avatar of Anubis

|